

Post by warcowboy on Oct 24, 2007 22:09:41 GMT -5
Ive been checking out the SP8 for a friend, to see what I could do for it as far as modding it to the point that no other SP8 will hold a candle to it in form nor function. lol
Here is what I have
This is a look at what I have been doing... I'll update as soon as I can...
This pic shows the stock configuration... But I bored the vent holes out on the forgrip and will be placing a thin black piece behind of plastic to give it a better simulated depth... The whole marker will be duracoated when Im finished, barrel, custom loader, and all...

This pic shows the reconfigured hose in its first step, just to give you an idea... The 4mm hose will actually be hiden beneath the rubber grip once I get the right fittings,and mill away a washout area in the grip frame to conceal the hose beneath it...
The remote ASA plug is replaceing the reg posistion, and will be pluged and tapped again for a banjo fitting to accept the 4mm hose. Once the hose it fitted under the grip, it will continue out along the bottom of the trigger guard through a hole I will drill out of the clip release tab to further conceal its appearance...

This is just a better view of how low profile this setup will be...
The point of all this is clearance for the bottom loader,and a better wieght distribution since the reg in the aft position will take the a bit of the weight back to better balance the marker over the trigger...

The cut off of the clip will act as the base I will be using for the loader mount... The two dots represent where the bolt holes will be drilled... The entire frame will be duracoated to match the rest of the marker paintjob, like as done with the real one, rather than the normal SP8's black seperation... I feel this is what ruines allot of the SP8's appearance vs the real XM8's lines...

Here you'll notice that I cut out the front of the shroud to further reproduce the look of the actual XM8
Here is something else that I am going to change.... The SP8 is a woods ball marker, and for that I dont much like the double trigger setup... This is also what aids is detroying the realistic lines... So Im going to make two removable panels for the side of the frame to correct this... (A) is stock,and (B) is what Im going to make, so it better matches ©

Anyhow back to what Im doing now>
This first pic, shows where I will be milling out the frame to accept an aditional 4mm hose through the length of where I drew a RED line to designate the area I will be milling...

The second shows a GREEN X , where the line will protrude though the bottom of the clip well to a banjo fitting that will be installed into a plug inplace of the regulator...

I have changed my mind on puting the reg on the ASA, to a better hidden location inside the stock. When done, you can expect a cleaner flow to the setup, with no extruding hoses.
This shows an example of where the reg will be installed, and how the hose will be run "inside" the frame...

Well, here is the milling complete in the frame.
This one shows where I milled... Uh emm... Or dremmeled more like... Not perfect, but perfectly functional none the less...

This one shows how the hose looks inplace...

Here you can see where the hole exits the clipwell bottom...

And finnaly, how it looks with the top half installed...

In this one, I resolved the ASA fill in cap.
This shows the plug I drilled and tapped for 10/32, and the ASA remote adatpter that I used to plug the reg's ASA...

This is just another pic of the setup, but together this time...

I was working on this some time ago, but had to take a break from this one for a while now, due to building other mods.
But I have something to do finaly.
I have the duracoat needed for this project now, and can start building the handgrips, and go from there.
I have the duracoat colors needed, "Tan" for the main color and frame, "Deep Black" for the XM8 prototype stamp on the side, and finaly "Oxide Black" for the ejector slide, trigger, cocking leaver, and barrel. Oxide will give the metal parts on this gun, the black/grey carbonized look the real weapons get from use.
I will also be adding "firing mode select switchs" to the body. I jacked them off an airsoft G36 and they are the same as the real XM8's.
They will also be fully functional if I can get the fella who makes the fire select switch prototype to sell me one for testing.
After I am finished with all those things, your going to be suprised at the loader system I have in store!
I also have to get an airsoft XM8 optic set.
I know the one from airsoft wont be worth a d***, so I plan to fit another real working optic inside of its shell if I should go this route.
I bought a piece of popular wood for the trigger cover, and handle I have to fabricate yet.
It will be a little work to get the shape Im after, but it will be worth it, once its done and duracoated to simulate a continuence of the molded handle on the real one. I will post some pics when I have some progress.
Anyhow, in the mean time, here is a cool pic I found of an early prototype of the XM8 design.
Looks an awful lot like the G36 series to me.

From the looks of how this guy holds his gun, I would say he has played paintball before! lol

This is the different variations of the real weapon.

This shows how the real color patterns on the gun. Notice the lower half, carry handle, and grip are all tan in form with the main color. Mine will reproduce this look with the duracoating, will have all the SP markings hiden beneath paint, and body filler.

Here are the duracoat colors I have to work with>


And for a closer look at the real XM8, you can watch these videos>
www.youtube.com/watch?v=63cxeEq5gUk
www.youtube.com/watch?v=GfbUdQLXn1A&mode=related&search=
Here is what I have
This is a look at what I have been doing... I'll update as soon as I can...
This pic shows the stock configuration... But I bored the vent holes out on the forgrip and will be placing a thin black piece behind of plastic to give it a better simulated depth... The whole marker will be duracoated when Im finished, barrel, custom loader, and all...
This pic shows the reconfigured hose in its first step, just to give you an idea... The 4mm hose will actually be hiden beneath the rubber grip once I get the right fittings,and mill away a washout area in the grip frame to conceal the hose beneath it...
The remote ASA plug is replaceing the reg posistion, and will be pluged and tapped again for a banjo fitting to accept the 4mm hose. Once the hose it fitted under the grip, it will continue out along the bottom of the trigger guard through a hole I will drill out of the clip release tab to further conceal its appearance...
This is just a better view of how low profile this setup will be...
The point of all this is clearance for the bottom loader,and a better wieght distribution since the reg in the aft position will take the a bit of the weight back to better balance the marker over the trigger...
The cut off of the clip will act as the base I will be using for the loader mount... The two dots represent where the bolt holes will be drilled... The entire frame will be duracoated to match the rest of the marker paintjob, like as done with the real one, rather than the normal SP8's black seperation... I feel this is what ruines allot of the SP8's appearance vs the real XM8's lines...
Here you'll notice that I cut out the front of the shroud to further reproduce the look of the actual XM8
Here is something else that I am going to change.... The SP8 is a woods ball marker, and for that I dont much like the double trigger setup... This is also what aids is detroying the realistic lines... So Im going to make two removable panels for the side of the frame to correct this... (A) is stock,and (B) is what Im going to make, so it better matches ©
Anyhow back to what Im doing now>
This first pic, shows where I will be milling out the frame to accept an aditional 4mm hose through the length of where I drew a RED line to designate the area I will be milling...
The second shows a GREEN X , where the line will protrude though the bottom of the clip well to a banjo fitting that will be installed into a plug inplace of the regulator...
I have changed my mind on puting the reg on the ASA, to a better hidden location inside the stock. When done, you can expect a cleaner flow to the setup, with no extruding hoses.
This shows an example of where the reg will be installed, and how the hose will be run "inside" the frame...
Well, here is the milling complete in the frame.
This one shows where I milled... Uh emm... Or dremmeled more like... Not perfect, but perfectly functional none the less...
This one shows how the hose looks inplace...
Here you can see where the hole exits the clipwell bottom...
And finnaly, how it looks with the top half installed...
In this one, I resolved the ASA fill in cap.
This shows the plug I drilled and tapped for 10/32, and the ASA remote adatpter that I used to plug the reg's ASA...
This is just another pic of the setup, but together this time...
I was working on this some time ago, but had to take a break from this one for a while now, due to building other mods.
But I have something to do finaly.
I have the duracoat needed for this project now, and can start building the handgrips, and go from there.
I have the duracoat colors needed, "Tan" for the main color and frame, "Deep Black" for the XM8 prototype stamp on the side, and finaly "Oxide Black" for the ejector slide, trigger, cocking leaver, and barrel. Oxide will give the metal parts on this gun, the black/grey carbonized look the real weapons get from use.
I will also be adding "firing mode select switchs" to the body. I jacked them off an airsoft G36 and they are the same as the real XM8's.
They will also be fully functional if I can get the fella who makes the fire select switch prototype to sell me one for testing.
After I am finished with all those things, your going to be suprised at the loader system I have in store!
I also have to get an airsoft XM8 optic set.
I know the one from airsoft wont be worth a d***, so I plan to fit another real working optic inside of its shell if I should go this route.
I bought a piece of popular wood for the trigger cover, and handle I have to fabricate yet.
It will be a little work to get the shape Im after, but it will be worth it, once its done and duracoated to simulate a continuence of the molded handle on the real one. I will post some pics when I have some progress.
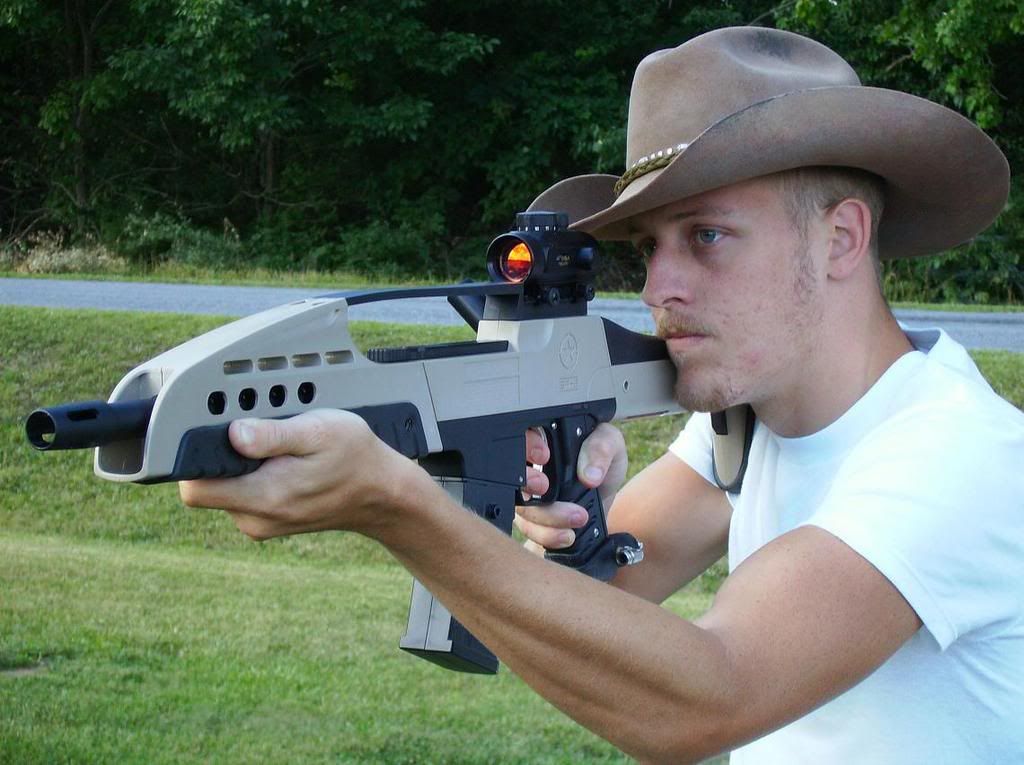
Anyhow, in the mean time, here is a cool pic I found of an early prototype of the XM8 design.
Looks an awful lot like the G36 series to me.
From the looks of how this guy holds his gun, I would say he has played paintball before! lol
This is the different variations of the real weapon.
This shows how the real color patterns on the gun. Notice the lower half, carry handle, and grip are all tan in form with the main color. Mine will reproduce this look with the duracoating, will have all the SP markings hiden beneath paint, and body filler.
Here are the duracoat colors I have to work with>
And for a closer look at the real XM8, you can watch these videos>
www.youtube.com/watch?v=63cxeEq5gUk
www.youtube.com/watch?v=GfbUdQLXn1A&mode=related&search=


